If you are building out Square Items for a cafe, bakery, or drink shop, the fastest path is not to open the item library and type everything in one by one. That is exactly how you end up spending hours cleaning up your own work.
The better start is to build in order. Start with categories, then move to modifiers and options, then create items, then build menus. Once you understand how Square Items stack on top of each other, setup gets a whole lot easier.
If you need a broader foundation before you organize Square Items, this Square quick start guide is a helpful companion. You can also keep a free Square cafe setup checklist nearby while you work through your dashboard.
- Why the order matters when setting up Square Items
- Start with categories and subcategories
- Understand the difference between modifiers and options
- Build reusable option sets first
- Create modifier sets with the right rules
- Create your first Square Items manually
- Use pre-made item suggestions carefully
- How to bulk import Square Items with a CSV
- How to import your CSV back into Square
- How to troubleshoot import errors
- Set allergens and nutrition details on food items
- Choose categories with reporting in mind
- Build menus from your categories
- Customize the POS layout
- What happens when you add new categories later
- A simple workflow for setting up Square Items without the mess
- Final thoughts on organizing Square Items
- FAQ
Why the order matters when setting up Square Items
Everything in Square builds on something else.
- Categories hold your items
- Items use options and modifiers
- Menus pull from categories and items
- Reporting depends on how you assign categories
So if you skip ahead and start entering products first, you usually have to backtrack to fix categories, menu structure, add-ons, and reporting later.
Start with categories and subcategories
Your categories are the containers for your Square Items. This is the first thing to set up, even if it feels less exciting than entering your drinks and food.
For a cafe, your category structure might look something like this:
- Food
- Breakfast
- Lunch
- Hot Drinks
- Iced Drinks
- Pastries
If Square already gives you starter categories based on your business type, use what helps and delete what does not. You are not stuck with the defaults.

As you build categories, pay attention to two things:
- Whether the category should appear on your point of sale
- The order of the categories in the list
The list order matters because that is how they appear on the POS. Put the most frequently used categories where you and your team can reach them quickly.
You can also switch between a standard list view and a hierarchy view to see your parent categories and subcategories more clearly.
Add images if they help your workflow
Square lets you assign images to categories. That can make the POS easier to scan, especially in a busy environment. If a visual button helps your team move faster, use it.
Understand the difference between modifiers and options
This is where a lot of people get tripped up when organizing Square Items.
Here is the simplest way to separate them:
- Options are variations of the item itself
- Modifiers are add-ons or customizations chosen at the time of order
What counts as an option
Options are things like:
- Small, medium, large
- Hot or iced
- Single shot, double shot, triple shot
These define versions of the product.
What counts as a modifier
Modifiers are things like:
- Type of milk
- Syrups
- Extra espresso shot
- Sweetness level
These do not create a whole new item. They are just adjustments to the order.
Build reusable option sets first
Before you create a drink, set up the options you know you will use over and over.
A common one is a cup size option set:
- Small
- Medium
- Large
Once that set exists, you can attach it to multiple Square Items without rebuilding it every time.
Create modifier sets with the right rules
Modifier sets are where you define the ordering experience. For a cafe, milk choices are a perfect example.
Your milk modifier set might include:
- Whole milk
- Oat milk
- Almond milk
- Soy milk
- Coconut milk
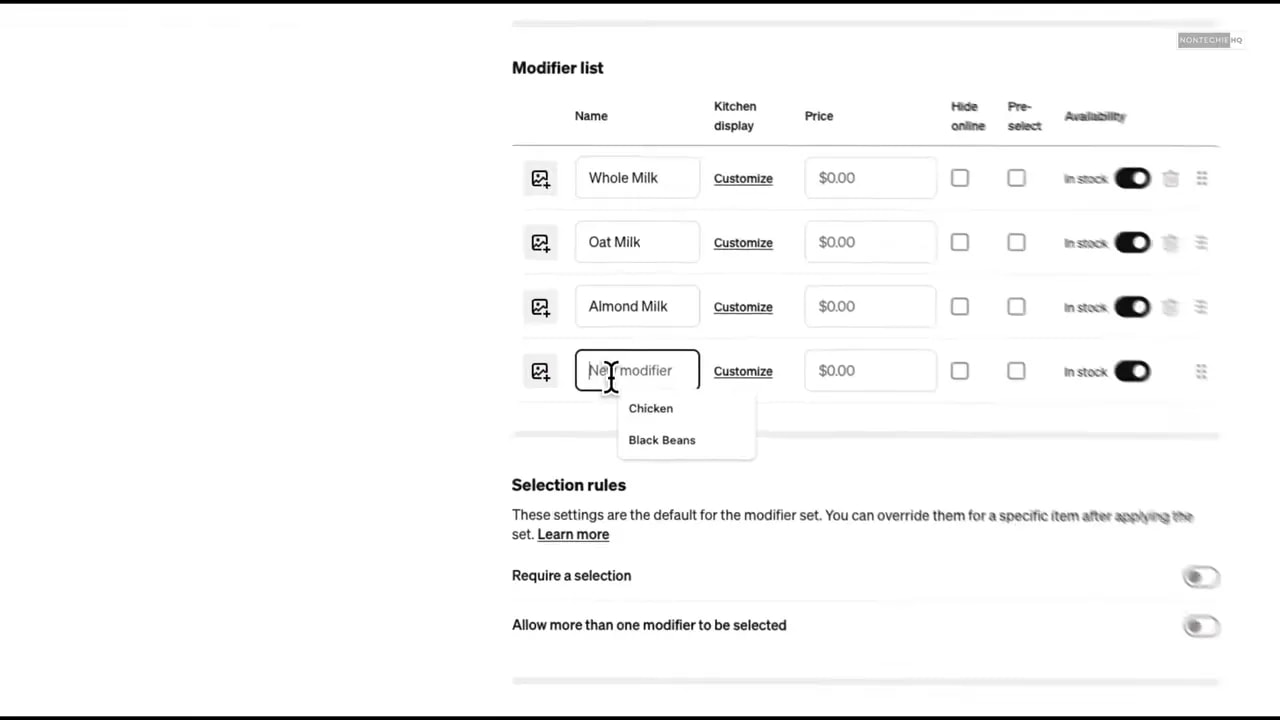
For each modifier, you can decide:
- Whether it has an extra charge
- Whether it should be preselected
- Whether it is available online, on POS, or both
- How it appears on the kitchen display
- Whether it shows on customer receipts
Use selection rules carefully
This part matters more than people realize.
You can require a modifier selection, allow multiple selections, and set minimums or maximums.
Examples:
- Milk choice should usually allow only one
- Syrups might allow up to three
- A default milk can be preselected if most drinks use whole milk
You can also push sold-out modifiers to the bottom of the list, which keeps the order screen cleaner during checkout.
Other useful modifier sets for a cafe
Once milk is done, you can build out other reusable sets such as:
- Sweetness level
- Espresso add-ons
- Iced coffee add-ons
Arrange these sets in the order that makes sense, because that order affects how they appear during ordering.
Create your first Square Items manually
Even if you plan to bulk import later, create at least one item by hand first. That gives you a clean example to export and copy from.
When you create an item manually, Square lets you choose the item type, such as:
- Prepared food and beverages
- Physical good
- Event ticket
- Donation
- Digital good
- Other
For a cafe drink, you will usually use prepared food and beverages.
What to fill out on each item
For each of your Square Items, work through these fields:
- Item name
- Kitchen name
- Price
- Unit cost if you want margin tracking
- Customer-facing description
- Images
- Sales tax settings
- Nutritional details
- Allergen info
- Category assignment
- Location and channel availability
You can also mark an item as temporarily sold out and set when it should automatically return.
Add variations and option sets
When you attach your cup size option set, you can keep only the sizes that apply to that product. If a drink comes in small and medium only, just uncheck large and keep moving.
You can also set:
- Online sale price
- SKU
- Low stock alert
- Shipping weight if needed
The online sale price is useful if you want to show a crossed-out original price online.
Add prep and checkout settings when needed
Square also lets you control how an item behaves at checkout. You can:
- Sell it as a pre-order
- Skip the item detail screen
- Set prep time
- Block it from being purchased alone
- Create payment links
- Flag alcohol-containing items
Use pre-made item suggestions carefully
Square may offer generated items and starter structures based on your business type. That can save time, but it can also create clutter.
If you use those starter items, expect to go in and remove anything you do not actually sell. There is nothing wrong with trimming it down. Clean is better than crowded.
How to bulk import Square Items with a CSV
If you have a larger menu, importing can speed things up a lot. But there is a catch. Importing works best after your options and modifiers already exist.
That is why the order matters so much with Square Items. If you pull the blank import template too early, the spreadsheet will not include the reusable pieces you need.

Best way to prepare the import sheet
- Create your categories first
- Create your option sets and modifier sets
- Build at least one item manually
- Export your library
- Use that export as your working template
That export will show you exactly how Square wants the data arranged, including option names, option values, and modifier sets.
Why exporting an existing item helps
When you export after creating a sample item, you can see how Square lays out:
- Descriptions
- Categories
- Item types
- Prices
- Archive status
- Alcohol fields
- Option set names and values
- Modifier sets
That makes it much easier to duplicate rows for new drinks and foods without having to guess.
Be careful when editing rows
When working in a spreadsheet, the biggest risk is editing the wrong line. One small shift can scramble the product setup and force you to redo the import.
For food items that do not need drink modifiers, clear out the milk, sweetness, and add-on fields instead of leaving mismatched values in place.
If you want more help with CSV-based setup, this guide on importing products to Square is worth bookmarking.
How to import your CSV back into Square
Once your spreadsheet is ready:
- Export it as a CSV
- Go back to Square
- Choose the import library
- Upload the file
- Review the preview carefully
That preview screen matters. This is your chance to catch bad categories, missing descriptions, wrong prices, or stray modifiers before they hit the library.
When you confirm the import, Square gives you two choices:
- Add and update the existing library
- Delete and overwrite the existing library
In most cases, you want to add and update. That brings in your new items and updates any existing ones with matching reference data. The overwrite option is much more destructive.
How to troubleshoot import errors
If your import throws an error, do not panic. Square will generate an error report that points you to the exact row and issue.
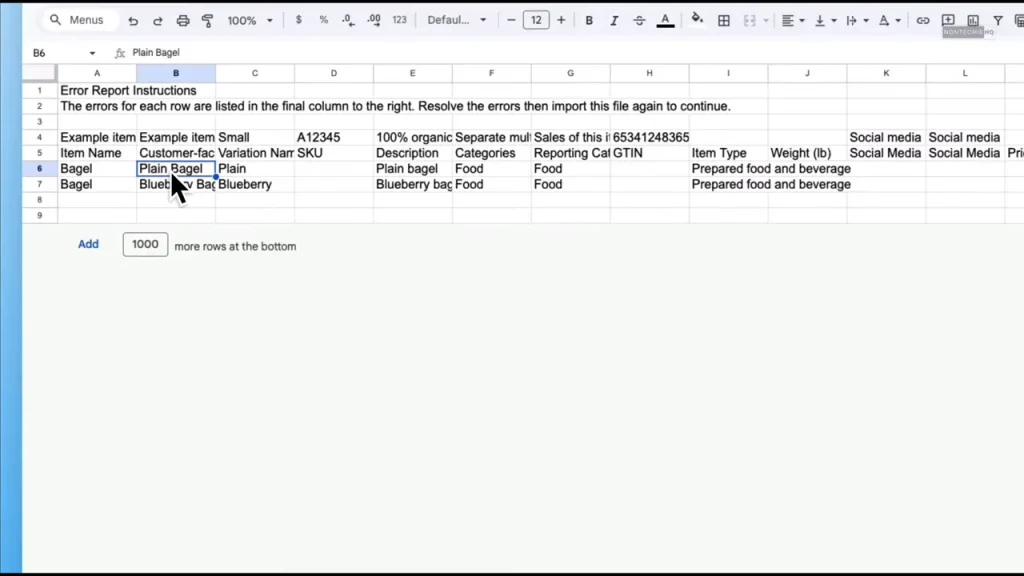
One example is when an item and its variations do not share the same customer-facing name.
For instance, if you tried to treat a plain bagel and a blueberry bagel as variations under one product while giving them different customer-facing names, Square will reject it. Those either need a matching parent-naming structure or to be separated properly.
The smartest way to avoid a massive cleanup is to test imports in smaller batches first. Do not try to upload your entire menu in one shot if you have not validated the structure.
Set allergens and nutrition details on food items
Once your items are in, go back and fill in the details that matter for customer safety and ordering accuracy.
For food products, this includes allergens and any nutrition information you want to provide. If an egg salad contains egg and possibly dairy, mark those allergens clearly.
This is especially important if you plan to use Square Online for ordering later.
Choose categories with reporting in mind
Category setup is not just about organization. It affects your reporting, too.
If an item belongs to both Food and Breakfast, the main category assignment determines how that sale is grouped in category sales reporting. So if you want to compare breakfast sales against lunch sales, make sure the breakfast subcategory is the lead category for breakfast items.
That way, you can quickly see:
- How breakfast is performing
- How lunch is performing
- Which specific products are pulling their weight
If you are building a more complete Square system, you may also want to review these Square tools for broader operational ideas, even if your business model includes both products and services.
Build menus from your categories
After your Square Items are set up, you can move on to menus.
Square lets you create menus in a few ways:
- Use existing categories
- Upload a file or photo of an existing menu
- Import from another platform
- Use generated items
- Start from scratch
If you have already organized your categories well, using existing categories is usually the easiest route.

Example menu setup
You might create:
- A breakfast menu
- A lunch menu
- A regular all-day menu
For each menu, you can set:
- Location
- Channels
- Days
- Start and end times
Use custom schedules for automatic menu switching
This is one of the handiest parts of the setup.
You can schedule your lunch menu to appear automatically at a certain time, like 11:00 AM until close. You can also give yourself a buffer between breakfast and lunch if you need time to transition.
Once those schedules are set, Square handles the switch automatically.
Customize the POS layout
Inside your menu setup, you can also edit the POS layout.
That lets you:
- Rearrange menu groups
- Change colors
- Show images
- Control how buttons appear on the register
This matters because a clean POS layout makes service run more smoothly. If your drinks, food, and seasonal categories are easy to spot, order-taking speeds up.
What happens when you add new categories later
This is an important detail. If you create a new category after a menu already exists, Square may not automatically add it to the menu.
To bring it in, you usually need to either:
- Create a new menu using existing categories
- Open the current menu and manually add the new menu group
When you add fresh Square Items or categories later, remember to update the menu, too.
A simple workflow for setting up Square Items without the mess
- Create your categories and subcategories
- Arrange category order for POS
- Create reusable option sets
- Create modifier sets and rules
- Build one or two items manually
- Export your library if you plan to bulk import
- Import additional items with CSV
- Fix any import errors in small batches
- Add allergens and item details
- Build menus and schedules
- Customize the POS layout
Final thoughts on organizing Square Items
When Square Items are built in the right order, everything else gets easier. Your menus make sense, your modifiers are reusable, your imports are cleaner, your reporting is more useful, and your POS is easier to work with.
If you skip the structure, Square feels messy fast. If you build the structure first, it starts to feel like a system.
If you need hands-on support sorting out your menu, modifiers, or imports, a Square help desk call can be a practical next step.
FAQ
* Some of the links in this article may be affiliate links, which means we may receive a small commission at no additional cost to you if you decide to make a purchase through one of our recommended partners. We only recommend products and services we trust, have used, or believe will benefit our readers. This helps support our efforts to bring you valuable content. Thank you for your support!