Your Square Checkout Grid can put the items, shortcuts, and tools you need right where you need them. Instead of working around a fixed layout, you can adjust tile sizes, choose colors, create POS-only groups, and keep common actions within easy reach.
You’ll start by checking your restaurant mode, then build your layout and use it to enter an order. These steps follow the iOS app. You should have the same workflow in the Android app.
What You’ll Learn
- You need Quick service, Full service, or Bar mode to use this layout editing workflow.
- You can customize tile sizes, colors, display names, and positions to organize checkout.
- You can create POS-only groups without adding those groups to your menu.
- You can reopen cart items to change options before continuing to payment.
- What You'll Learn
- 1. Check Your Restaurant Mode First
- 2. Open the Square Checkout Grid Layout Editor
- 3. Add Items and Customize Their Tiles
- 4. Create POS-Only Groups
- 5. Add Actions, Discounts, and Service Charges
- 6. Sort, Arrange, Preview, and Save
- 7. Enter an Order With the Updated Grid
- Help With Your Square Setup
1. Check Your Restaurant Mode First
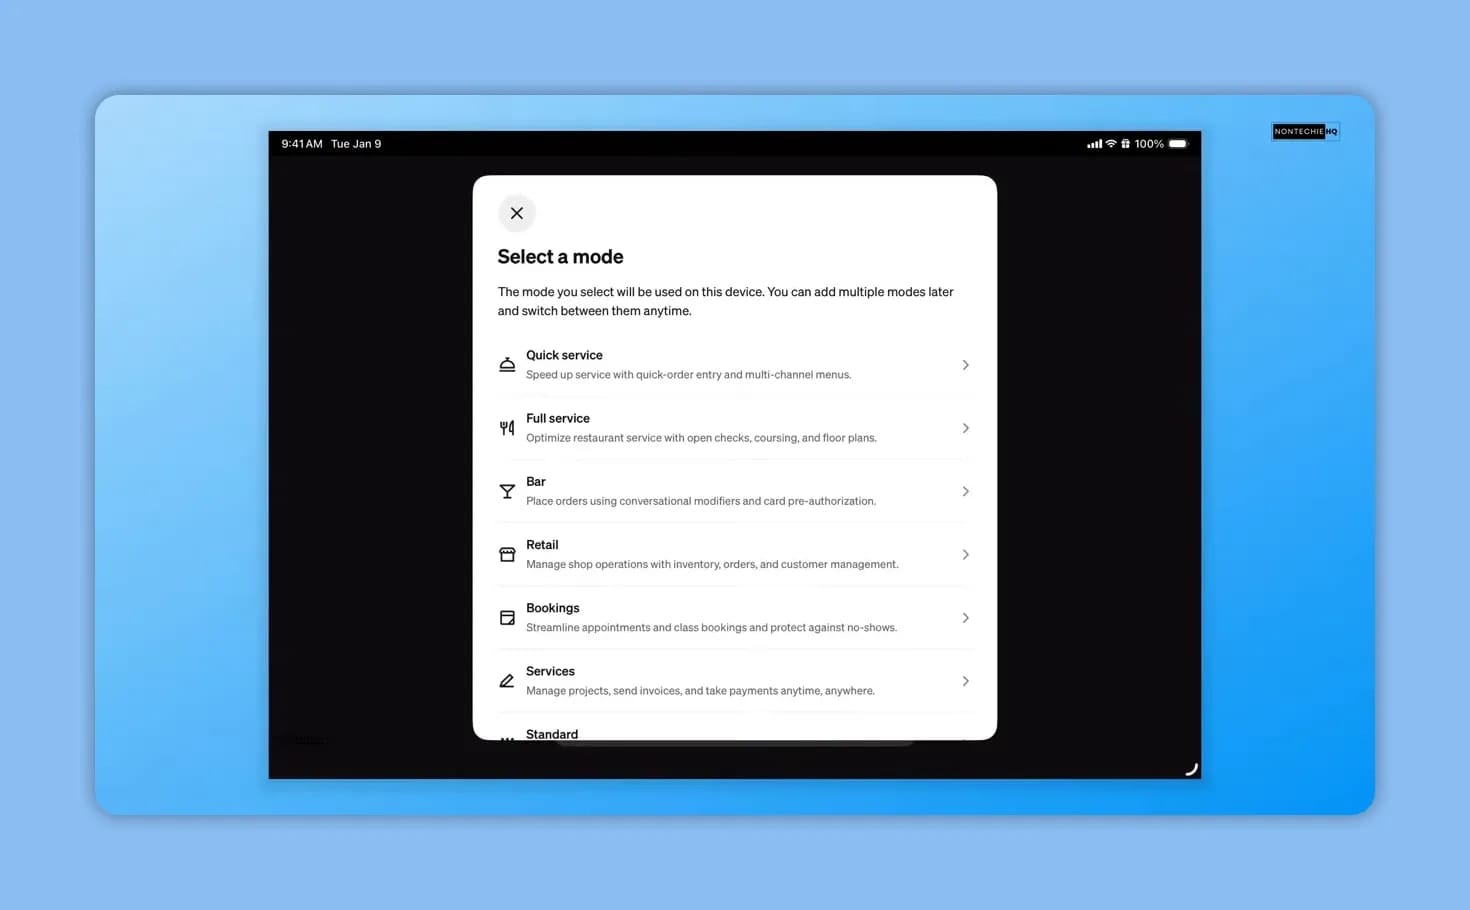
Before you edit your Square Checkout Grid, open More and check your current mode. For the layout editing workflow covered here, you need to be in one of these restaurant modes:
- Quick service
- Full service
- Bar
If you’re already in Quick service, you’re ready to continue. If you’re in a different mode, switch to the appropriate restaurant mode before trying to update the grid.
You’ll also want your menus and items set up before arranging the Square Checkout Grid. The layout gives you access to those items; it doesn’t replace the underlying menu setup. If you still need help with that foundation, the menu setup tutorial covers creating and updating your menus.
2. Open the Square Checkout Grid Layout Editor
Once your mode is correct, return to Menu. You’ll see the updated checkout interface, with your menu tiles on the left and the sale area on the right.
- Tap the book icon to open your menus.
- Select Edit POS layout.
- Sign in to the menu editor.
- If appropriate for your device, turn on Stay signed in to skip signing in again for later updates.
- Tap Sign in to open the layout editor.
Inside the editor, your current POS layout appears on the left. Depending on your store, you may already have tiles such as Favorites or Drinks. The panel on the right gives you sorting controls or settings for whichever tile you select.
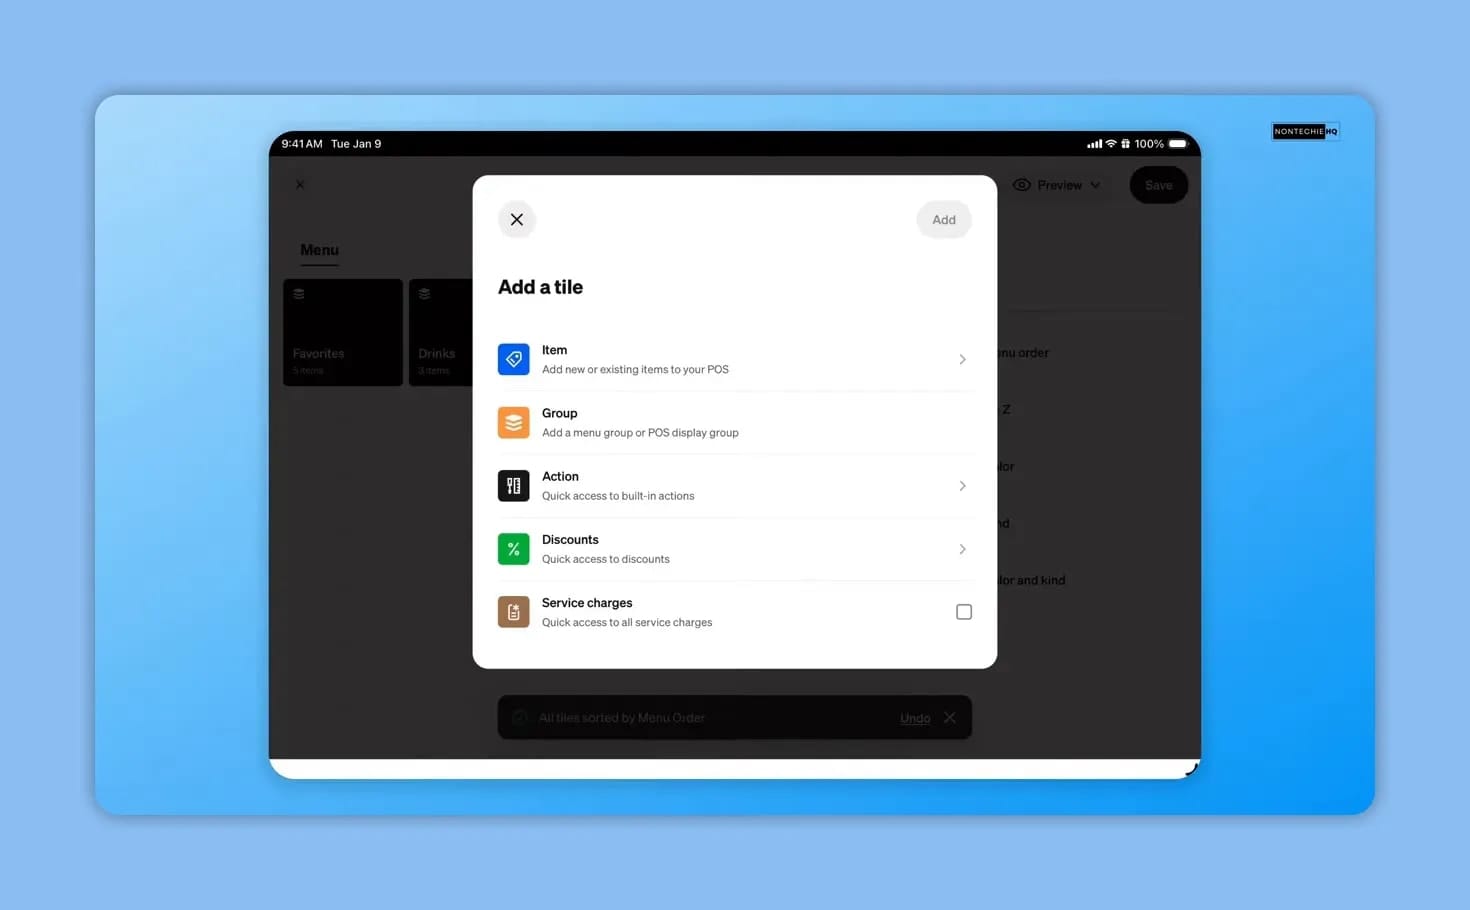
To add something to your Square Checkout Grid, tap a plus sign in an open grid space. You’ll have five tile types to choose from: Item, Group, Action, Discount, and Service charge.
3. Add Items and Customize Their Tiles
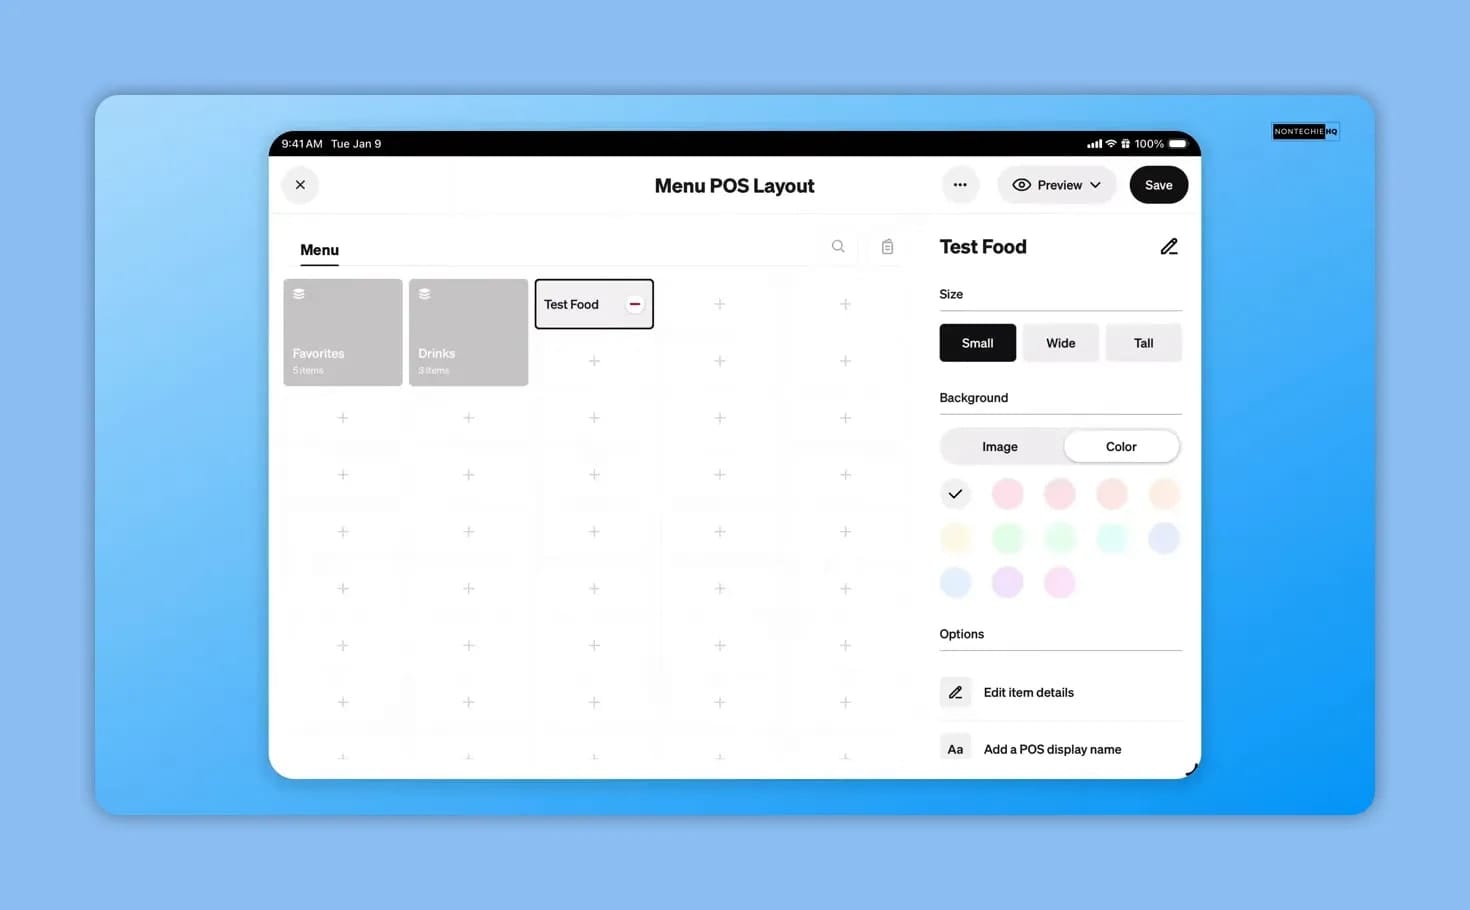
Choose Item to add existing items individually or select them from an existing category. In the sample setup, you can use the Test Food entry to try the tile controls.
Once you’ve added an entry, select its tile to change how it looks on your Square Checkout Grid. You have three size options:
- Small: A compact tile.
- Wide: A tile that takes up more horizontal space.
- Tall: A tile that takes up more vertical space.
You can also change the tile color. Size and color give you a straightforward way to make the layout easier to recognize and navigate.
Keep Display Changes Separate From Item Details
The editor offers more than just appearance controls. Through Edit item details, you can access settings such as:
- Item name
- Kitchen-facing name
- Price
- Categories
- Kitchen routing
If you only need a different label on the Square Checkout Grid, use POS display name. That gives you a dedicated place to adjust the POS label instead of changing the item name simply to make a tile easier to read.
You can also restore the tile defaults or remove the item from the POS layout. Choose the control that matches what you’re trying to change: the tile’s appearance, its display label, or the item’s underlying details.
4. Create POS-Only Groups
A group lets you organize items within your Square Checkout Grid without adding a new group to your menu. Its display name and contents are for the POS.
- Tap a plus sign and choose Group.
- Create a POS display group and enter its name.
- Choose a small, wide, or tall tile.
- Select a color.
- Choose Go to group to open it.
- Add the items you want inside the group.
- Return to the main menu layout and save.
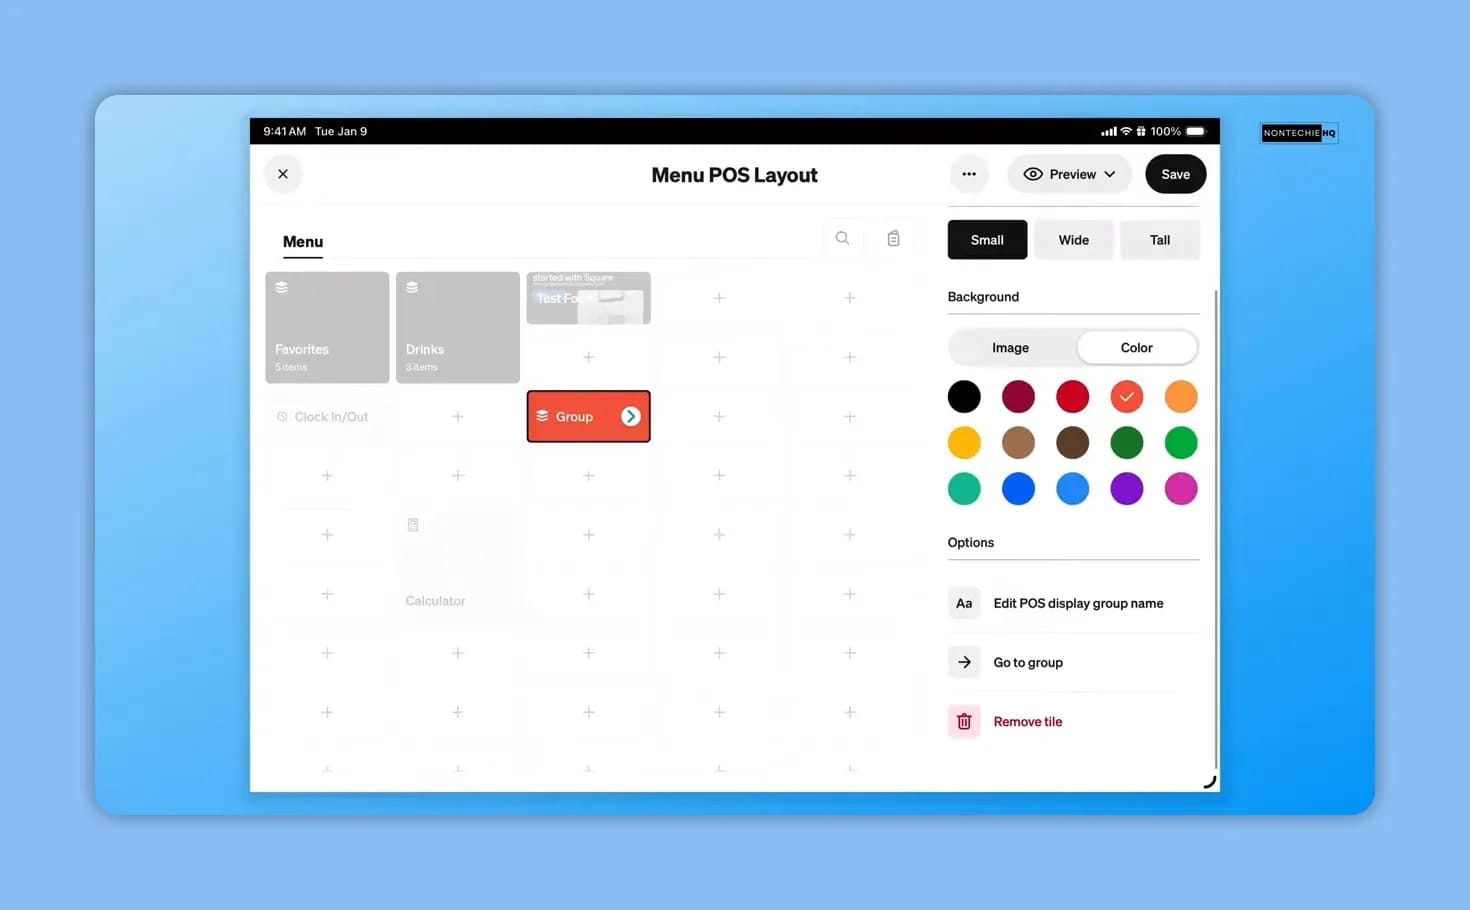
A POS display group is not the same as a menu category. You’re organizing how your staff accesses items at checkout, rather than adding a group to the menu itself. You can edit the group’s display name from its tile settings if you need to change it later.
5. Add Actions, Discounts, and Service Charges
Your Square Checkout Grid doesn’t have to contain only food and drink items. You can add shortcuts for the tasks you use while building and managing a sale.
Add Action Tiles
Tap a plus sign, choose Action, and use the checkboxes to select the actions you want. Then tap Add actions.
The action list includes:
- Check management: Assign, Check name and notes, Move, Seats, and Split.
- Amounts and adjustments: Auto gratuity, Calculator, Comp, Custom amount, Custom quantity, and Void.
- Customer tools: Customer, Dining options, Gift cards, Rewards, and Notify when ready.
- Staff and cash tools: Clock in, Clock out, Open drawer, and Pay in/out.
Notify when ready is identified as a Plus feature in the action list. Check the feature availability for your setup before relying on it.
Once your actions are on the grid, press and hold a tile, then move it to the position you want. You can use the same approach to arrange other tiles.
Add a Discount Shortcut
Choose Discount from the tile options, then select an existing discount. For example, you can add an employee discount so you can access it directly from your Square Checkout Grid.
After adding it, move the tile where you want it and choose its size. The discount tile supports the same small, wide, and tall options.
Add a Service Charge Shortcut
Choose Service charge to add that shortcut to the layout. Select the tile afterward to adjust how it displays.
Service charge settings are updated in your Square Dashboard account. The layout editor controls the shortcut’s placement and appearance. If you are looking for guidance for help with Service charges or other settings for your setup, this walkthrough would be helpful:
6. Sort, Arrange, Preview, and Save
You can organize your Square Checkout Grid manually or use the editor’s sorting options:
- Menu order
- A to Z
- Color
- Kind
- Color and kind
When you choose a sort option, the editor rearranges your tiles and fits their different sizes into the grid. You’re not locked into that arrangement. You can still move tiles yourself to get the layout you want.
Once you’ve finished arranging the Square Checkout Grid, tap Save. You can also refresh the editor or sign out through its controls.
Before leaving, use Preview to check the tablet or mobile layout. This gives you a chance to review how your arrangement fits each display. When you’re done, tap the X to close the editor and return to checkout.
7. Enter an Order With the Updated Grid
With your Square Checkout Grid saved, you can start using it for orders. Open a group or menu entry and select an item. The updated item screen introduces variations and option sets into the ordering workflow, while keeping the cart visible on the right.
For the sample combo order, you can select Beef as the variation, then choose a side of fries.
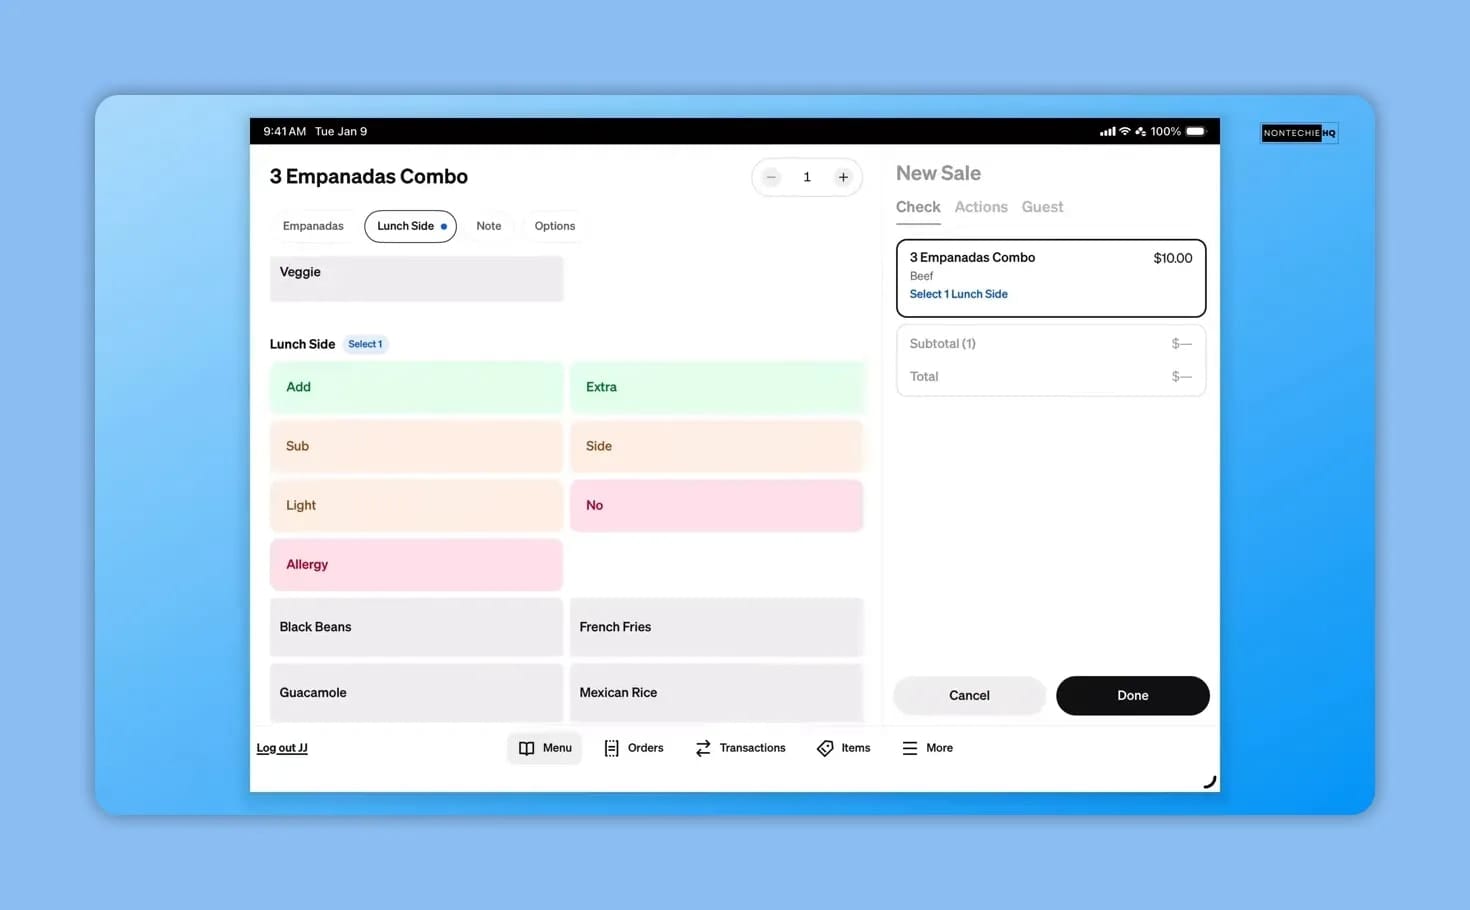
Before completing the item, you can:
- Add notes.
- Set the fulfillment method.
- Add a discount.
Tap Done to finish adding the item. If you need to make a change afterward, tap the item in the cart to reopen its options. Adjust the selection and finish the edit.
Manage the Check and Take Payment
The checkout Actions area gives you access to Scan, Sort, Clear items, Name and notes, Fulfillment, Customer, Discount, Rewards, Service charges, Menus, Calculator, Gifts, Clock in, Clock out, and Custom amount.
To name the check, open Name and notes, enter the name, and save it. The name then appears above the sale. You can also use the Guest area to add a customer.
Once the items, options, and check details are correct, tap Pay and continue through your normal payment process. The Square Checkout Grid changes how you organize and enter the order, while payment remains the familiar next step.
Help With Your Square Setup
If you need help putting the foundation in place, the Square POS Setup Service for Local Businesses covers connecting your POS, enabling online ordering, delivery, and managing your Google Business Profile.
If you already have a setup but aren’t sure what needs fixing, the Square Setup Audit for Cafes and Restaurants provides a written report, a prioritized action plan, and a walkthrough call.
Your goal is a checkout layout that fits the way you work. Start with the right mode and complete item setup, put your everyday tools within reach, then save and preview your layout before using it for orders.